MetaTrader NonLagMA EA
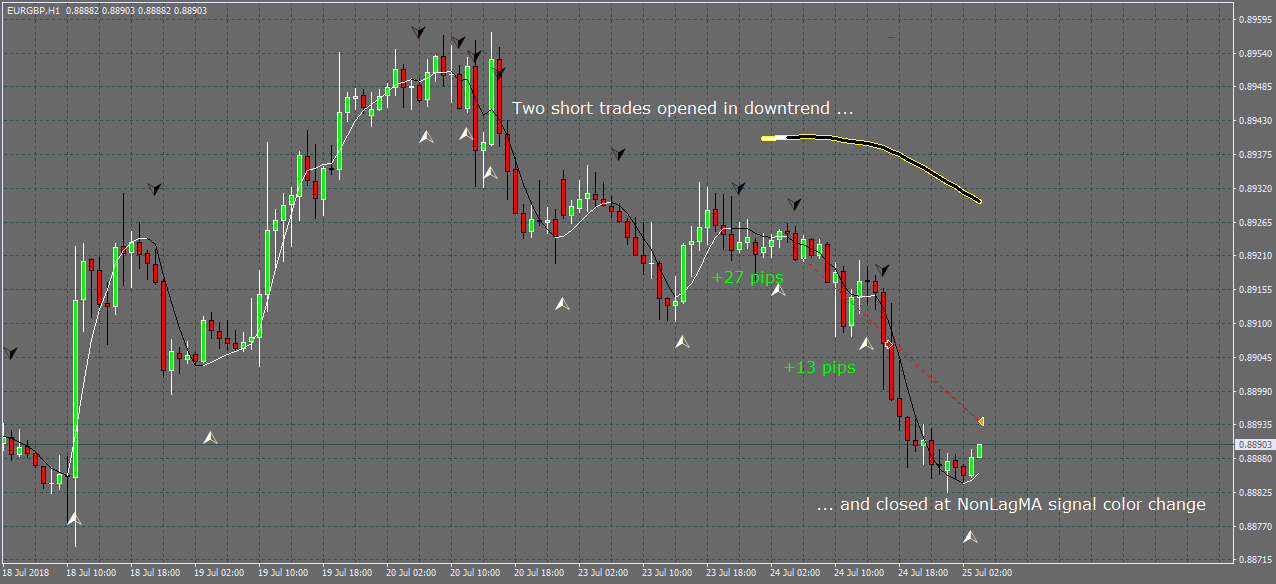
The RobotFX NonLagMA expert advisor is a trading tool designed for traders trading with the trend and whose forex trading strategy is defined by the “trend is your friend” motto. This Metatrader expert advisor is similar to the Fluid expert adviser and its main functions are basically the same. The EA can detect the trend and trade accordingly, as well as hedge and recover the losses from a losing trade. Of course, classic stop-loss, break-even and trailing stop are also possible.![RobotFX NonLagMA [stay] RobotFX NonLagMA [stay]](https://blogger.googleusercontent.com/img/b/R29vZ2xl/AVvXsEjafbeinbVTYrW628ExuO89f7f_vWHNvs0zs1mHx-94BFjZeHh0_KSVhEZtIF2_9aGpdzoVsx1DuCfsIRM94Ys9eY0NkaiJ8T5dotjnWX2VQ9m81aQYm3jxdAc301GBc35fpsZklrAv7io/s1600-rw/nonlagma.png)

Technically the RobotFX NonLagMA EA can:
1. detect the trend (uses the nonlagma indicator color, price position or both)
2. enter (or exit a winning trade/basket) on the nonlagma indicator signal
3. trails the price - for the winning trades
4. hedges the zone recovery or with the trend - for the losing trades (a regular stoploss can also be used)


The second nonlagma indicator is used to enter - and if the trader chooses so, to exit - a trade. Exiting a trade at the nonlagma reverse signal may ensure that the trader has closed the trade at the right moment, just before the trend would reverse.
For the experienced traders, there is the possibility to enable the martingale and to double/triple/etc the next trade’s lotsize, if the previous one was a loss.
RobotFX NonLagMA EA settings
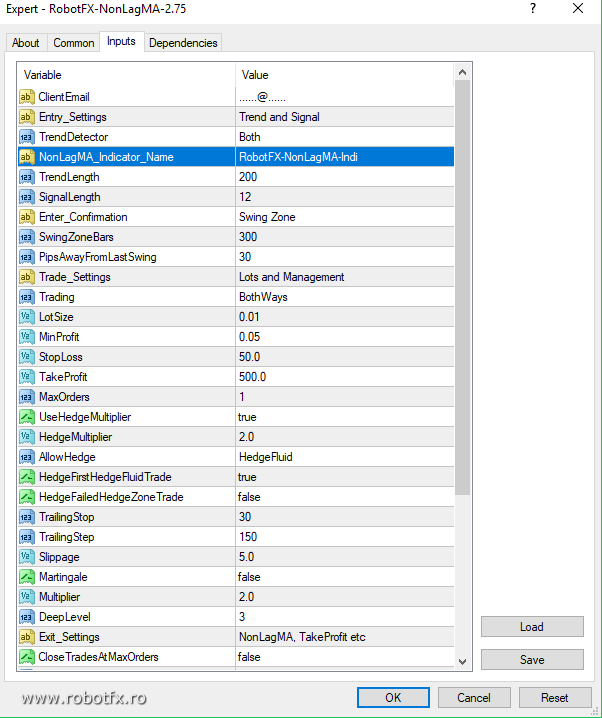
Take your time to understand what each of these settings does. After you’ve done that, try to optimize the default settings based on the pairs you are trading, the time-frame you trade on, your equity and initial LotSize etc.
![RobotFX NonLagMA EA settings [stay] RobotFX NonLagMA EA settings [stay]](https://blogger.googleusercontent.com/img/b/R29vZ2xl/AVvXsEgSyXLh7s5UZ0jG9yCODXr2PqUJG0P2nzK0I1khwDB_eT_ZbswJiXAZKd-lbuXevue2MpX0Np6U0eYf3kSTYSA7jL5Ag0yWxvm46JAIiJ1CDVPhyphenhyphen5is2sSHbmWSr030Q6OQ8PNX7ie5TCs/s16000-e365-rw/nonlagma-ea-settings.webp)

- Enter your Client Email - fill this with your email IF you are using a paid version of this EA on a LIVE account
- Sunday to Friday - Indicate whether or not you want to trade each specific day
- NFP Friday - Whether or not you want to trade on volatile Non-Farm payroll Friday, first Friday of the month
- Thursday Before NFP - Whether or not you want to trade on the Thursday before the volatile Non-Farm Payroll Friday
- Christmas Holidays - Whether or not you want to trade during a custom defined period in December, during the low liquidity of the Christmas Holidays
- Christmas Holidays Start (20th Dec) - This is the day in December you will start to filter out, as the beginning of the Christmas Holiday. Default is 20th, you can enter any date instead of 20
- New Years Holidays - Whether or not you want to trade during a custom defined period in the beginning of January, the low liquidity of the New Years Holidays
- New Years Holidays End (5th Jan) - This is the day in January you stop the filter, the end of the New Years holiday period. Default is 5th January, you can enter any date instead of 5
- Auto GMT Offset - Indicate if you want auto GMT offset turned on or off. Turn off during back testing
- Manual GMT Offset - If AutoGMTOffset is turned off, indicate what your manual GMT offset would be
- Enable Trading Session - Set to false to ignore the below trading sessions, or to true to trade within the sessions
- Trade Tokio Session - Whether or not to trade Asian session
- Start Tokio Session - Don’t trade before this time. If you include Australia, Sydney starts at 21.00, and Tokyo starts at 23.00 GMT
- Finish Tokio Session - Don’t trade after this time. Defaulted at 07.00, the start of the European Session. Note: The Tokyo session continues on for 1 more hour to end at 08.00, so if you are interested in trading this session in its entirety, you should indicate from 23:00 to 08.00
- Trade London Session - Whether or not to trade European session
- Start London Session - Don’t trade before this time. Defaulted at 7.00 GMT, the start of the London Session, though Germany does not open till 08.00
- Finish London Session - Don’t trade after this time. Note: The European Session continues till 16.00, so if you are interested in trading this session in entirety, you should have your defaults from 7.00 to 16.00
- Trade New York Session - Whether or not to trade the New York session
- Start New York Session - Don’t Trade before this time. Note that the NY stock exchange does not open till 9:30 EST, or 13.30 GMT, and the first hour and half (from 9:30 to 11:00 EST, or 13:30 to 15:00 GMT) is heavy trading, lots of liquidity
- Finish New York Session - Don’t Trade after this time
- Determine the Trend by:
- NonLagMA Trend Color - considers an uptrend if the nonlagma (Trend Length) color is up (default white) and downtrend if it's black
- NonLagMA Trend Price Position - if the price is above the nonlagma (Trend Length) the EA will be allowed to buy (uptrend), if it is below, to sell (downtrend)
- NonLagMA Trend Color & Price Position - both of the option above (color & price position) must match in order to determine the trend
- Disabled - the EA will open trades whenever the nonlagma (SignalLength) changes the color, regardless the trend nonlagma (TrendLength)
- NonLagMA_Indicator_Name - this is the name of the non-lag moving average indicator file (RobotFX-NonLagMA-Indi.ex4), without the filetype .ex4
Make sure that the nonlagma indicator exists in the MetaTrader’s Indicators folder as the EA needs it to determine the trend and to spot trade entries & exits
- Trend Length - the length of the nonlagma trend detector (if you set a very high value, >200, you might not be able to test it n the strategy tester)
- Signal Length - the length of the signal nonlagma used to enter/exit trades
- Swing Zone Bars - the number of bars to determine the swing zone's highs and/or lows)
- Pips Away From Last Swing (0 = swing zone disabled) - EA will open new trades only if the nonlagma signal occurs this number of pips away from the last swing; set to 0 to ignore the swing zone confirmation
- Trading - whether or not to allow the EA to open trades in a particular direction (Allow Buy, Allow Sell), any direction (Buy & Sell) (this is ignored by the hedging trades opened when if Hedging Method = Hedge Zone)
- Enable Lot Size Management (%) - Whether or not to use a percentage of the Free Margin to open the next first trade. Note: does not apply to hedging or martingale lotsize
- Lotsize as % of Free Margin - the size of the first opened trade as percentage of Free Margin, if the Lot Size Management (above) is enabled
- LotSize as Fixed Value - the size of the first opened trade, if the Lot Size Management is set to false
- MinProfit - the minimum profit, in deposit currency, to close a trade or a basket of trades
- Stop Loss / Recovery Zone (pips) - the distance (pips) from the opened trade where the stop-loss will be placed or, f Hedging Method = Hedge Zone, the height of the Recovery Zone
- Take Profit (pips) - Take profit distance in pips. The ratio between Stop Loss and Take Profit is also used to calculate the opposite hedging trades
- Maximum Orders - the maximum numbers of allowed trades. When this number is reached, the EA will not open any other trades
- BreakEven / Trailing Stop (pips) - the distance the price has to move in your favor, for the expert advisor to place the stop-loss
- Trailing Step (pips) - the EA will move the stop-loss of the trade at the Trailing Stop distance from the actual price, as soon as this is at Trailing Step distance from the opening price. AKA trailing the price
- Buffer for BreakEven & Close Losing Trades… (pips) - this adds to the BreakEven / Trailing Stop above, so when the EA places the stop-loss, it will be in profit with this number of pips. AKA locking the profit
- Slippage (pips) - the buffer allowed when opening new trades or placing pending orders
- Close Trades When Maximum Orders is reached - whether or not to allow the EA to close all the trades on the chart as soon as this number is reached
- When Minimum Profit is reached… - what to do when the profit reached Minimum Profit ($$$.$$)
- Start closing ALL trades on the chart - whether or not to allow the EA to close a trade or basket of trades as soon as the profit reaches Minimum Profit ($$$.$$)
- Start closing LOSING trades & Set BE for winning trades - close the losing trades and set a stop-loss for the winners
- Close Trades at Take Profit - whether or not to allow the EA to close a trade or basket of trades at Take Profit level (Minimum Profit must be reached as well)
- Close Trades at NonLagMA Signal - whether or not to allow the EA to close a trade or basket of trades at NonLagMA signal (Minimum Profit must be reached as well)
- After the EA will close the trade/s - continue trading (Continue Trading), remove from the current chart (Remove the EA from the chart) or close the trading terminal (Close MetaTrader)
- Show Comments on Chart - whether or not to display the trading details on the chart
- Enable Alerts - whether or not to get notified (alerts, email, push notifications or all) when trades open/close
- Magic Number (-1 = no magic number) - change this when activating the EA on other charts of the same pair, otherwise the EA on one chart will execute its commands on the others. Leave to -1 to allow the EA to monitor/hedge trades opened manually
- Hedging Method - choose your desired hedging method (Hedge Zone - recovery zone such as used by Auto Recovery EA (zone recovery), or Hedge Fluid (hedge with the trend) or simply disable hedging (No Hedging) and the expert advisor will place a classic stop-loss (Stop Loss) and take-profit (Take Profit) accordingly to suit ECN brokers
- Enable Hedging Lot Size Multiplier - whether or not to use a lotsize multiplier when hedging. If set to false, the EA will use the ratio between the Stop Loss/Take Profit
- Hedging Lot Size Multiplier - the next (opposite) hedging order lotsize multiplier
- Hedge Only Last Order Lotsize - if enabled, it will set the hedging lotsize based on the last order lotsize instead of considering the entire baskets of opposite trades
- When Hedging Fluid, hedge 1st trade - whether or not to place a pending hedge order even when Hedging Method = Hedge Fluid
- When Hedge Zone & gap occurs, open hedge trade - whether or not to automatically hedge an opened trade when the price skips a pending hedge order (such as when gaps occur during weekends)
- Enable Martingale - whether or not to increase the lotsize of the next opened order if previous order closes with negative profit
- Martingale LotSize Multiplier - the martingale multiplier for the previous (losing) order
- Martingale Level - the number of times (in a row) the expert advisor will keep increasing the lotsize of the next opened trade; after that it will resume with the initial LotSize

Add a review